Getting started
This guide shows new users the first steps with the Cloudfleet platform. You create an organization, launch a cluster, connect a cloud account, and deploy and expose your first application.
Cloudfleet Kubernetes Engine (CFKE) is a fully managed Kubernetes service. It runs containerized workloads on clusters that can span multiple cloud providers and on-premise setups, with a single pane of glass for infrastructure management. Different infrastructure environments each have their own tools and configurations. CFKE gives you a unified control plane and a consistent operational experience across them.
If you know traditional Kubernetes, one key difference is how Cloudfleet provisions infrastructure. In traditional environments, you provision virtual machines or physical servers upfront. You decide the node count and instance types before you deploy applications. Cloudfleet reverses this workflow: you connect your cloud account (called a Fleet), deploy your workloads, and Cloudfleet automatically provisions the optimal nodes to run them. Cloudfleet continuously monitors your cluster and automatically removes unused nodes when workloads scale down. You do not need capacity planning, and you pay for infrastructure only while you need it.
To follow this guide, you need:
- A Cloudfleet account. New accounts start with €200 in credit, valid for 30 days, so you can complete this guide without any charges.
- An account with a supported cloud provider. This guide uses Hetzner Cloud, but AWS, GCP, or your own Linux servers work equally well.
- About 15 minutes.
Understanding key Cloudfleet concepts
Before you start, learn a few core concepts of the Cloudfleet platform. These concepts are central to how Cloudfleet simplifies and automates Kubernetes management.
Cloudfleet Kubernetes Engine (CFKE)
CFKE is the core of Cloudfleet’s offering. It is a fully managed Kubernetes service that runs containerized workloads across different cloud and on-premise infrastructure environments at the same time.
Managed control plane: CFKE has a managed Kubernetes control plane. Cloudfleet handles the setup, maintenance, availability, and scalability of the Kubernetes API servers and the persistence layer. You do not manage the Kubernetes master components, so you can focus on your applications.
Node auto-provisioning: The CFKE node auto-provisioner provisions and manages worker nodes on supported cloud providers (AWS, GCP, and Hetzner Cloud). Worker nodes are the compute infrastructure where applications run. The node auto-provisioner selects optimal compute instances, scales them based on workload demands, optimizes costs, and handles the full node lifecycle. On these platforms, you do not need to create or size worker nodes manually.
Self-managed nodes: For infrastructure beyond the natively supported cloud providers, you can add any VM or bare-metal Linux server to an existing CFKE cluster. This extends Cloudfleet to any cloud provider, on-premise environments, or edge locations. You can provision self-managed nodes with Terraform or add them manually, so Cloudfleet is infrastructure-agnostic.
For a detailed comparison of these approaches and guidance on when to use each, see How Cloudfleet provisions nodes.
- Kubernetes compatibility: CFKE runs upstream Kubernetes and follows Kubernetes conformance standards. Applications on CFKE are portable and work with existing Kubernetes tools and plugins without modification.
Fleets
A Fleet is a connection between your CFKE cluster and a cloud provider account (AWS, GCP, or Hetzner Cloud) where Cloudfleet can provision worker nodes. When you create a Fleet, you give Cloudfleet permission to create and manage virtual machines in your cloud account for you.
Cloudfleet provisions nodes directly in your cloud provider account. You pay the cloud provider for infrastructure with your existing agreement, credits, or discounts. All workloads run in your own cloud account, and Cloudfleet manages the Kubernetes layer without accessing your application data. Cloudfleet requests only the permissions needed to provision and manage nodes, and you can revoke access at any time.
A single CFKE cluster can have multiple Fleets across different cloud providers, so workloads can run across AWS, GCP, and Hetzner at the same time.
Step 1: Creating your Cloudfleet organization
First, create a Cloudfleet organization. You create the root account together with the organization. The organization gives access to the Cloudfleet Console, the central hub to manage organizations, clusters, and other resources.
- Visit the sign-up page: Go to the Cloudfleet sign-up page. The process takes only a few minutes.
- Enter your details: Provide your name, email address, and password.
- Choose your organization type: Select whether the organization is personal (for individuals) or business (for legal entities). Business organizations use a company legal name on invoices and can add a VAT or tax ID.
- Add billing information: Enter a billing address and a payment method. Both are required to create an organization. Cloudfleet accepts credit and debit cards for all organizations, and SEPA Direct Debit for business organizations. Every new account starts with €200 in credit, valid for 30 days, so there is no charge to begin.
- Activate your account: Follow the instructions sent to the provided email address to activate the account.
- Access the console: After you set up and activate the account, log in to the Cloudfleet Console with your credentials.
For details on cluster plans and pricing, see the Cloudfleet pricing page.
When you have an active organization, you can invite your team members to it.
Step 2: Creating your first CFKE cluster
When you create a cluster, you get an empty Kubernetes cluster with no nodes. To run applications, the cluster needs worker nodes. A Fleet provisions them from a cloud provider account or on-premises resources. You set up the Fleet in the next step. First, create the cluster.
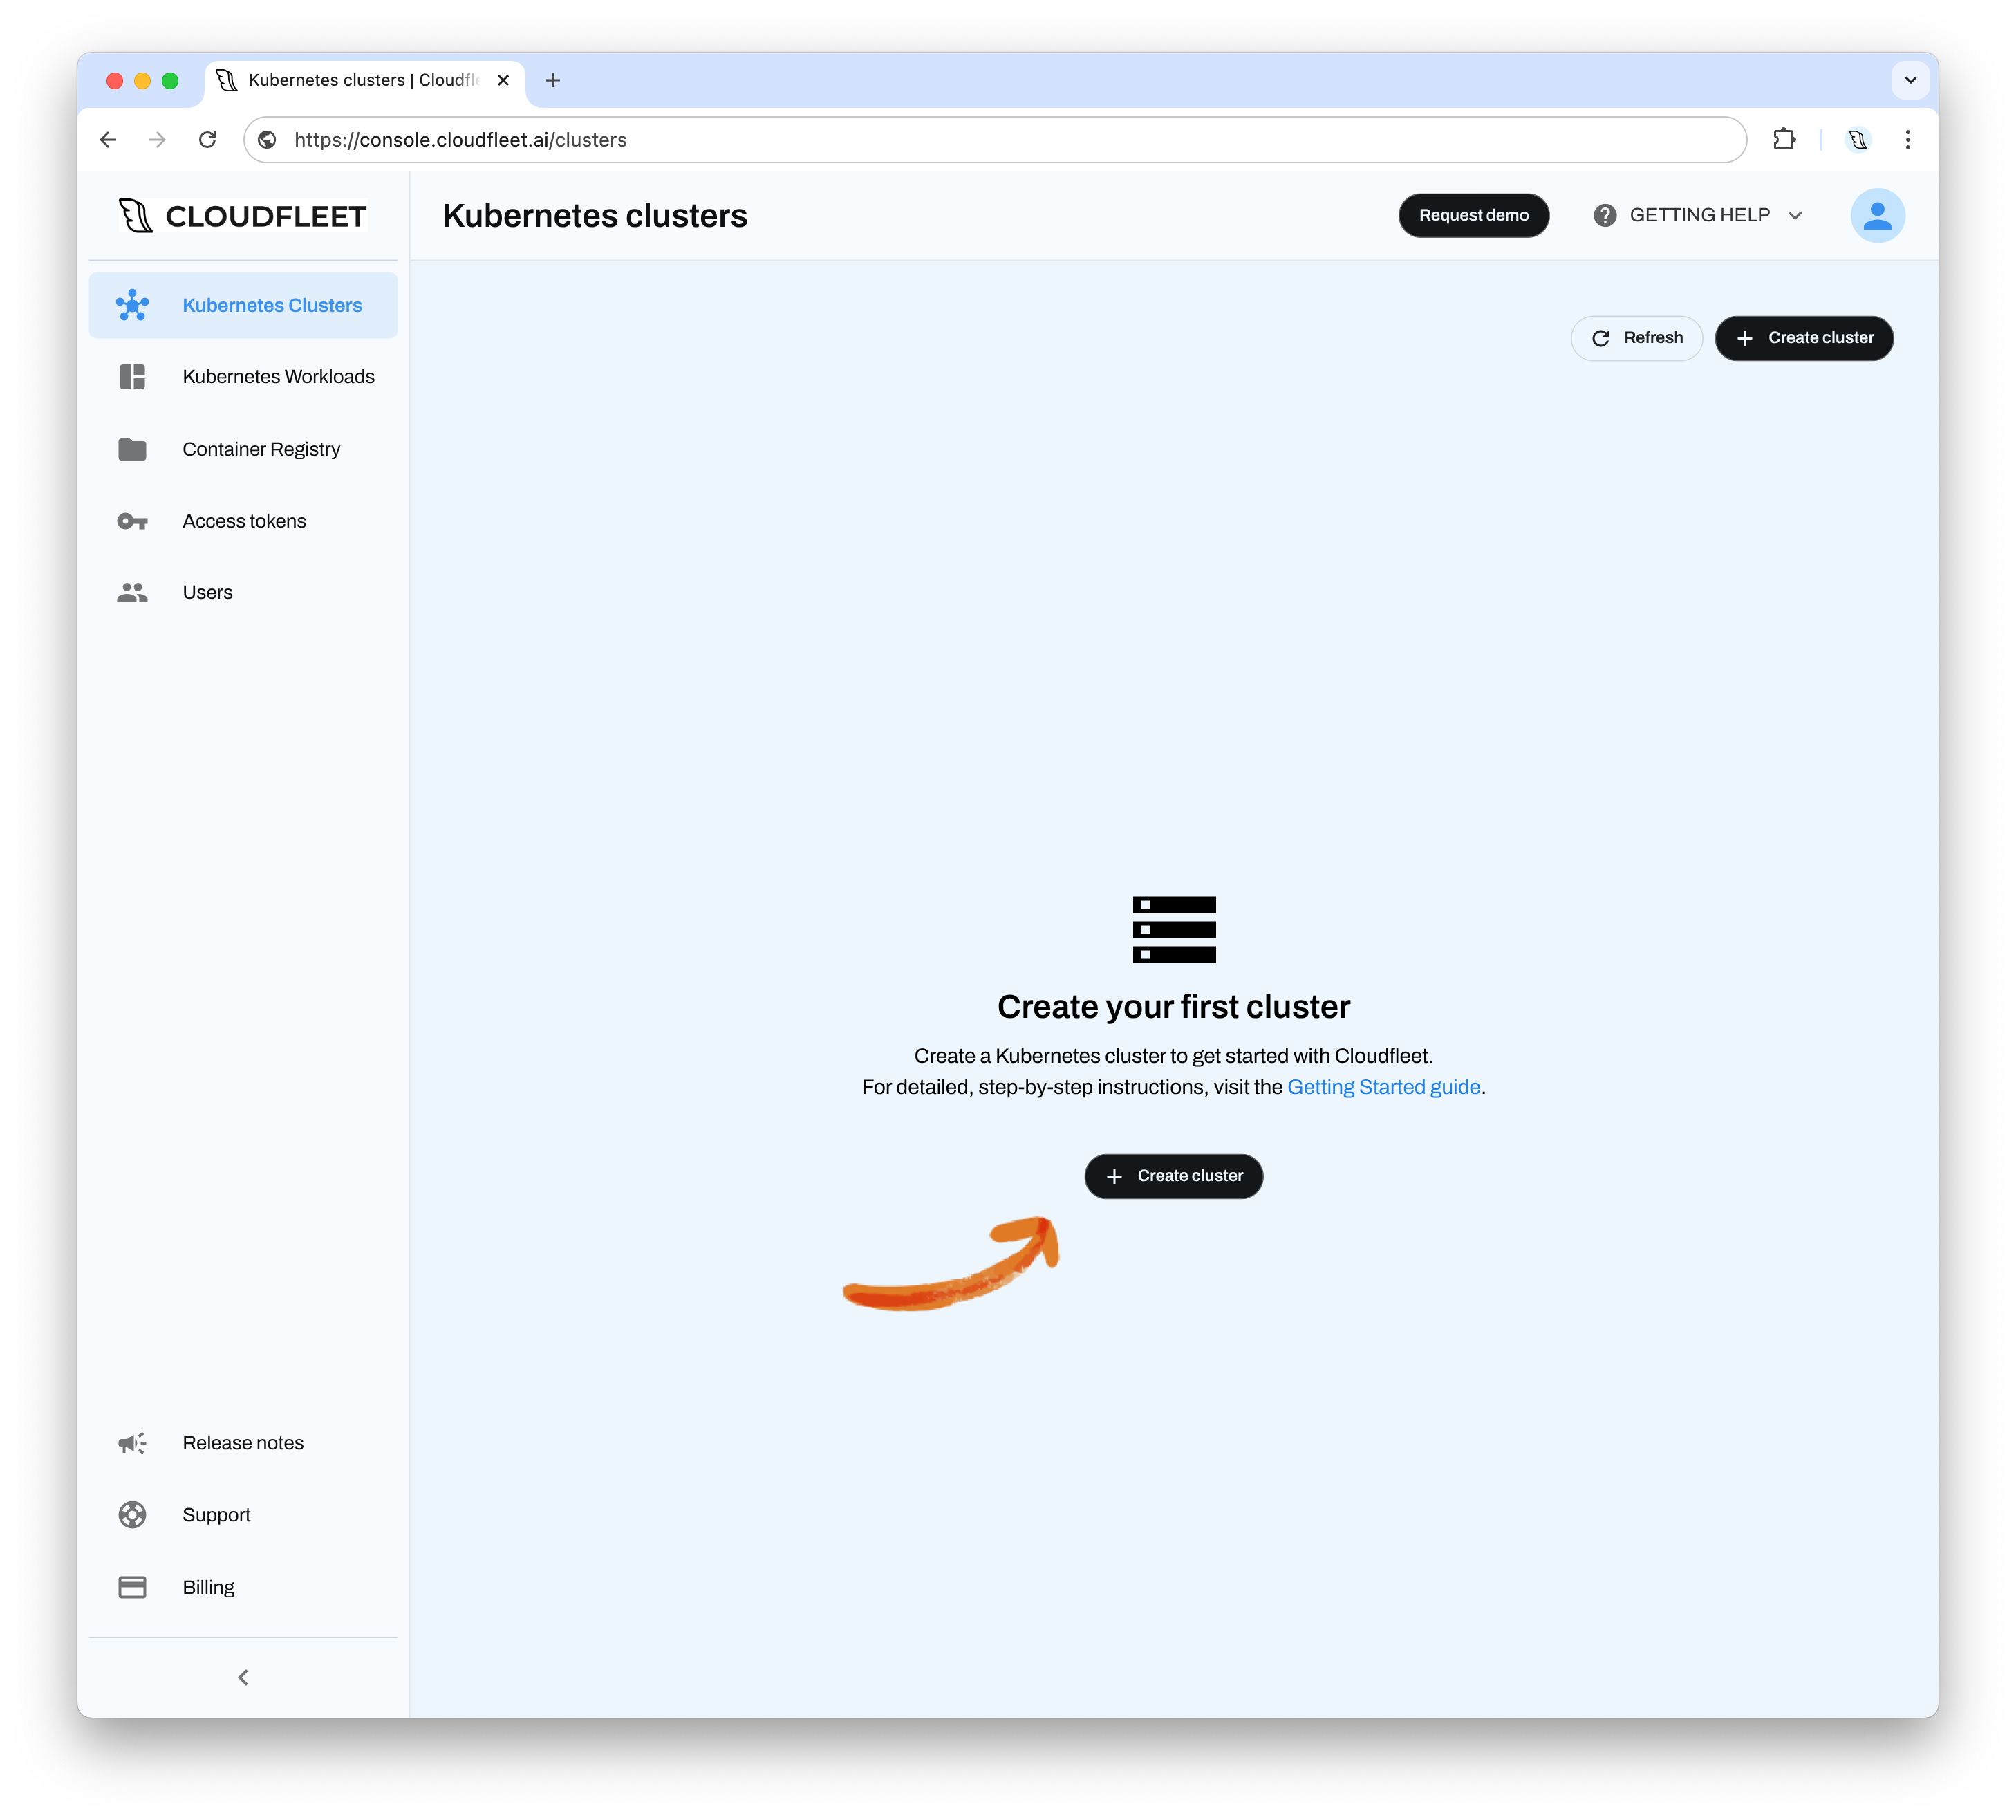
Start the wizard: In the Cloudfleet Console, click “Create cluster” to start the cluster creation wizard.
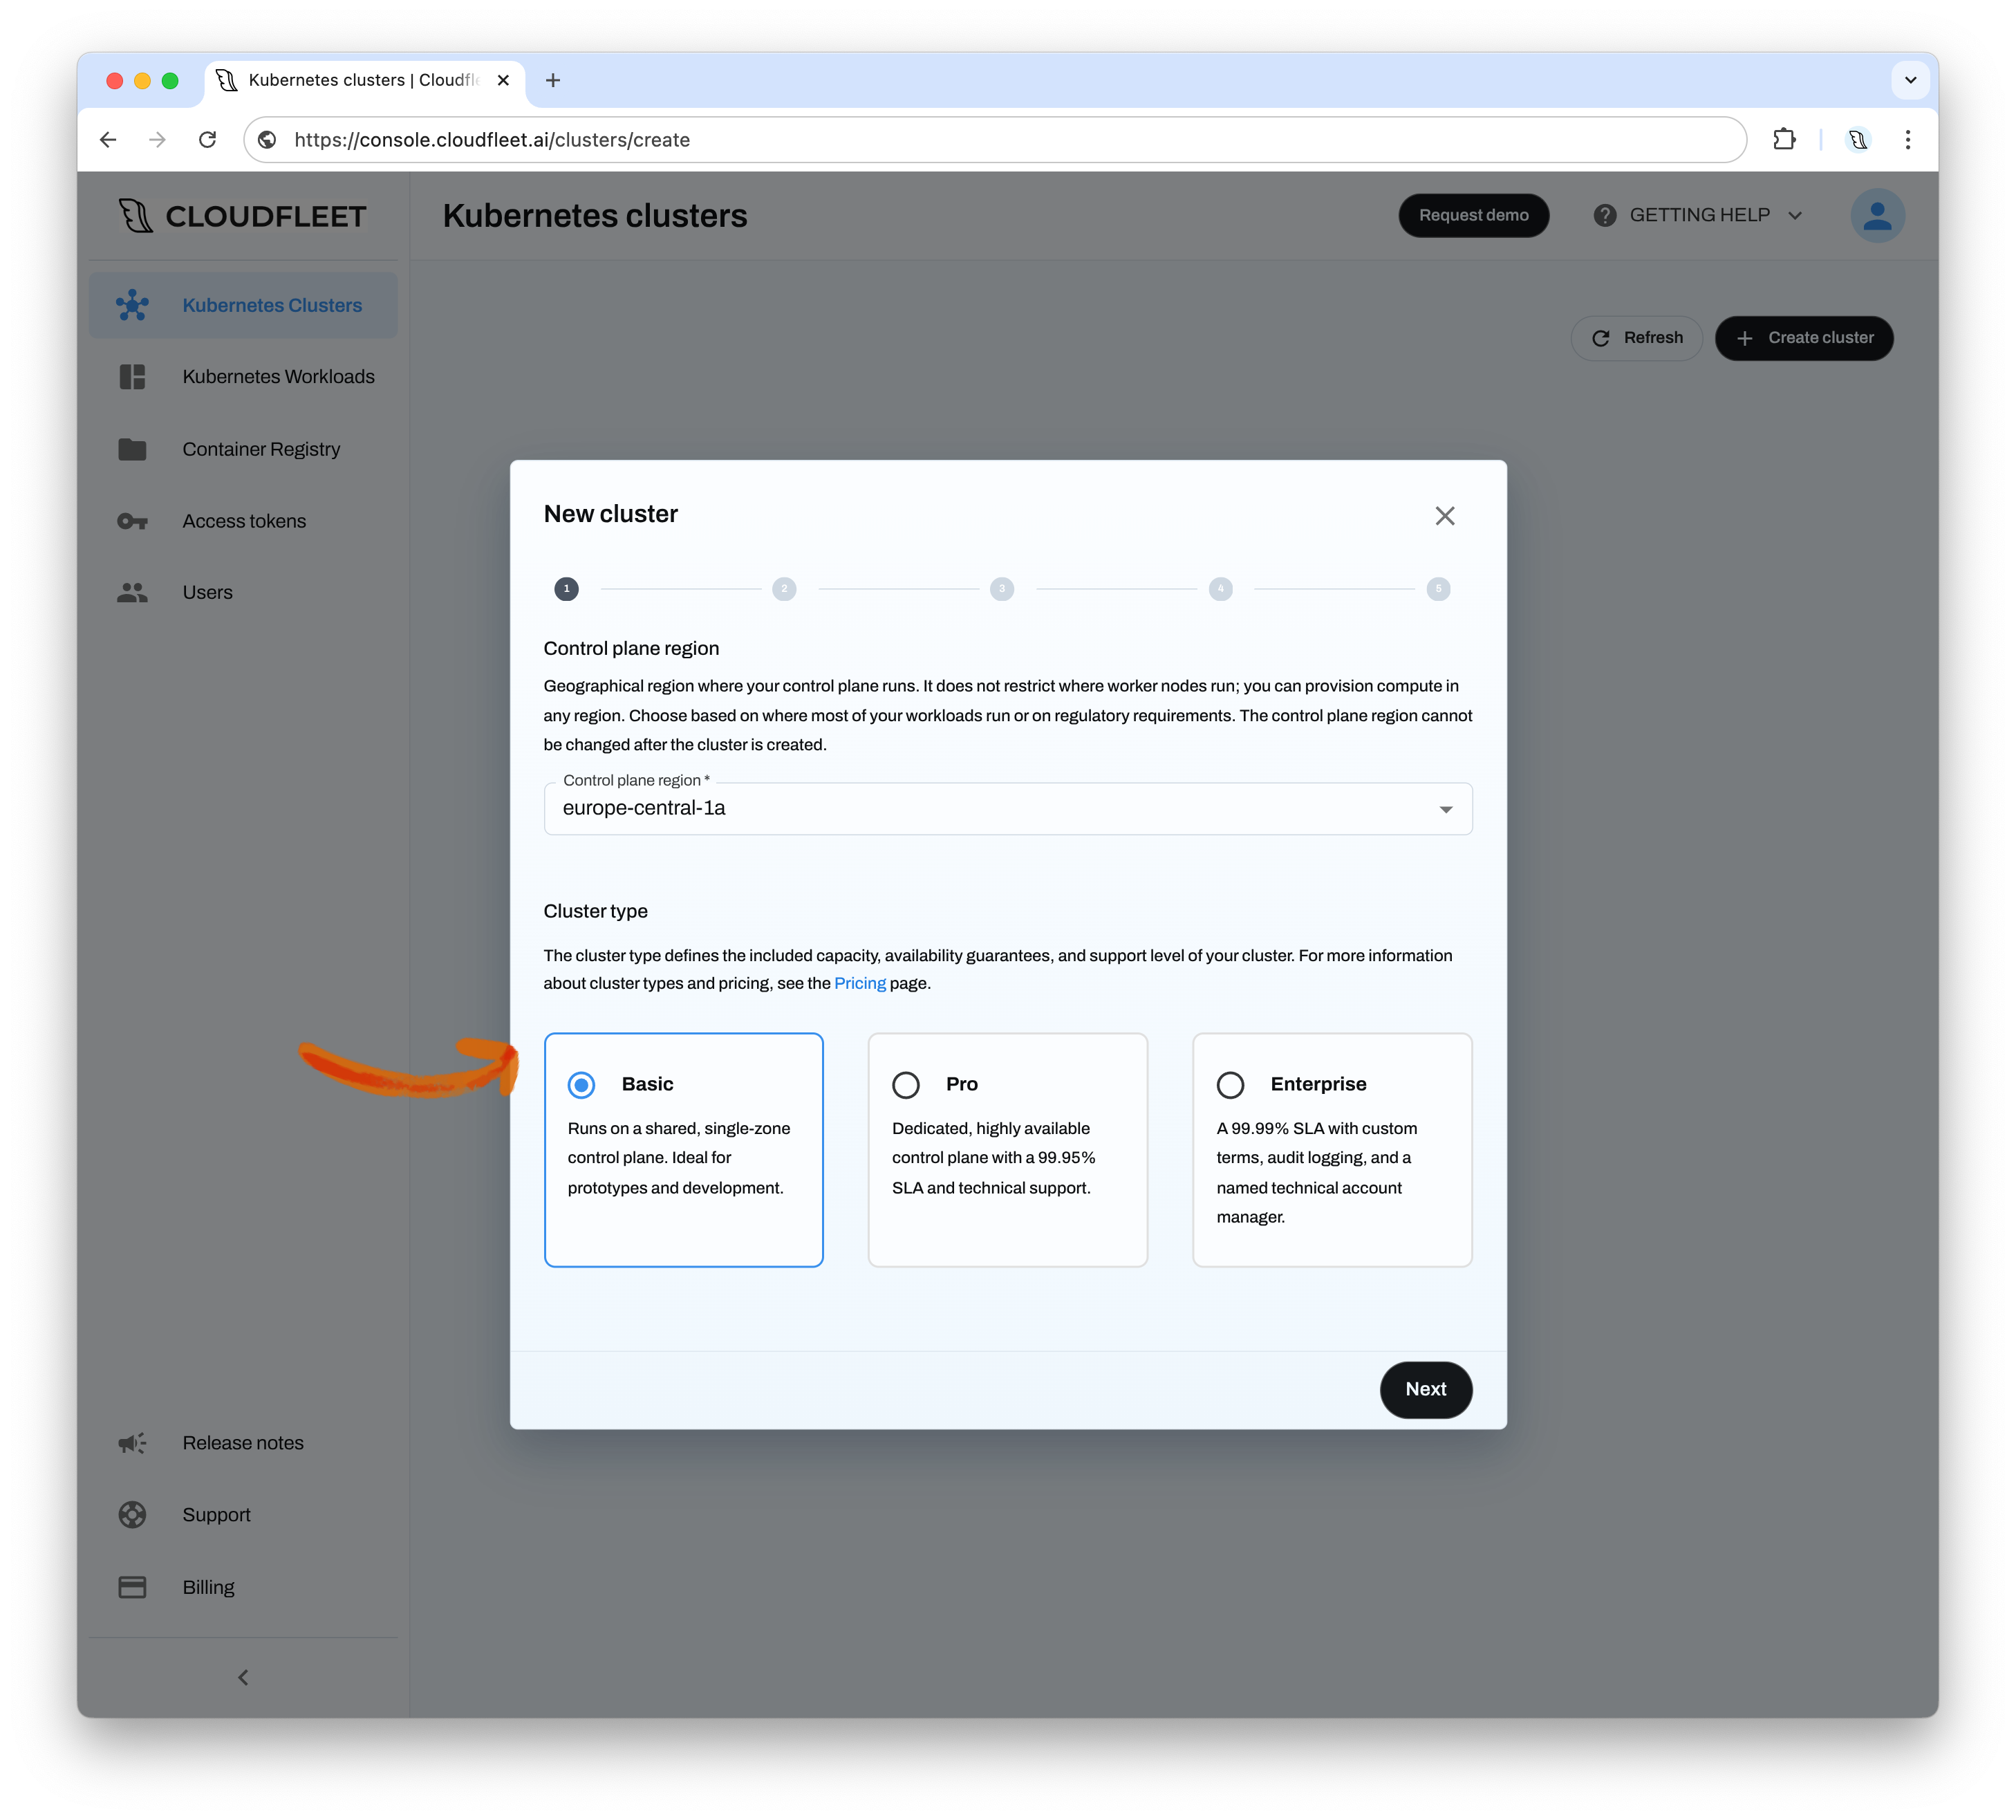
Choose the control plane region and cluster type: The control plane region is the geographical location where your cluster’s control plane runs. It does not restrict where your worker nodes run. A Cloudfleet cluster can span nodes across multiple regions, multiple cloud providers, and on-premises hardware at the same time. Choose a region close to most of your workloads, or one that meets your regulatory requirements.
You cannot change the control plane region after you create the cluster.
For the cluster type, Cloudfleet offers three tiers. Basic runs on a shared, single-zone control plane with a low monthly base fee. It is for development, testing, and non-critical workloads. Pro has a dedicated, highly available control plane with a 99.95% uptime SLA and technical support. Pro is the recommended choice for production. Enterprise adds a stricter SLA with custom terms, audit logging, and a named technical account manager. You can start with Basic and upgrade later. See Cluster types for a detailed comparison.
Set the name, Kubernetes version, and release channel: Choose a human-friendly name for the cluster (for example,
my-first-cfke-cluster). The default version,1.x.x, always tracks the latest v1 release. The release channel controls how quickly your cluster adopts new Kubernetes versions. The defaultRapidchannel adopts new versions as soon as Cloudfleet publishes them. TheStablechannel (Pro and Enterprise clusters) and theExtendedchannel (Enterprise clusters only) roll out more conservatively. See Kubernetes versions and upgrades for details.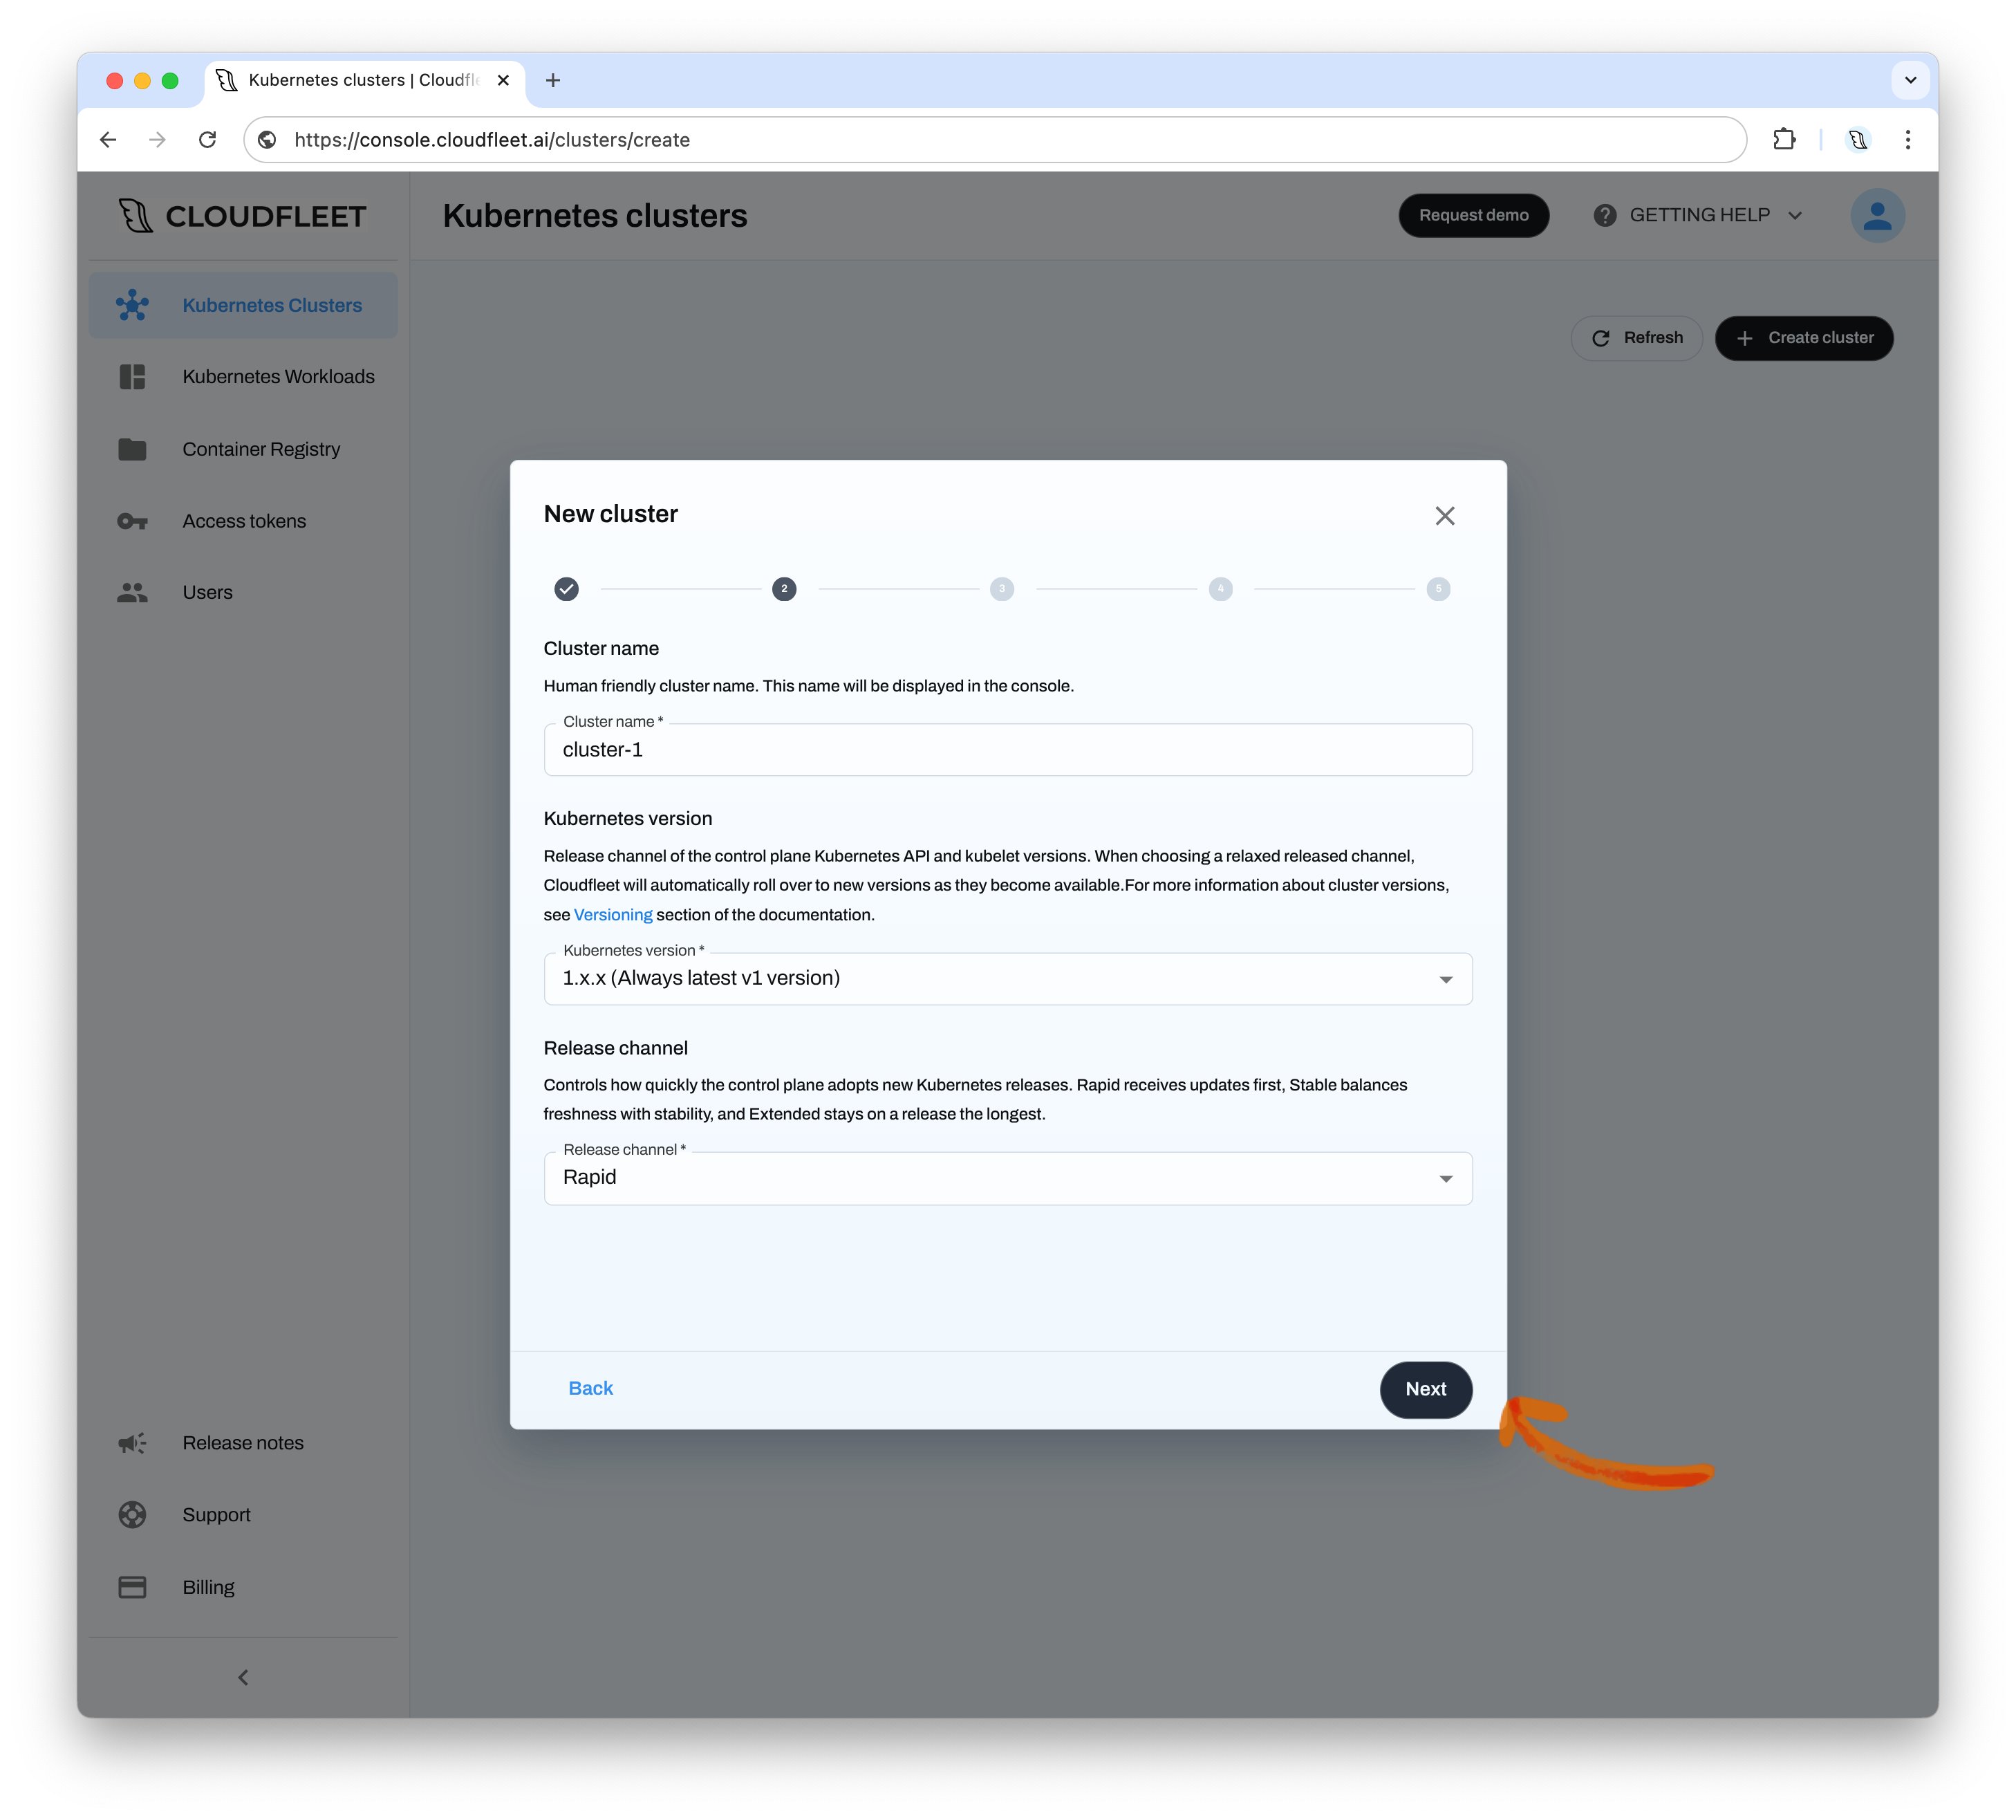
Review the remaining options: The next steps let you customize networking and GPU sharing. Both options require a Pro or Enterprise cluster. The defaults are good for a first cluster.
Create the cluster: The final step displays your selected configuration. Review your choices and click “Create”. Provisioning the control plane takes 2-3 minutes. The console shows when the cluster is ready.


Step 3: Adding compute capacity with a Fleet
When the cluster’s control plane is active, the cluster needs worker nodes to run applications. Fleets provide these nodes. A Fleet is a connected cloud account or on-premises infrastructure where Cloudfleet can provision and manage nodes.
When you define a Fleet, you do not create nodes. You only specify the cloud provider and give the necessary authorization details. When you deploy an application, Cloudfleet evaluates its requirements (for example, CPU, memory, region). It then provisions the right number and size of nodes in the connected cloud account. If Cloudfleet detects idle capacity, it removes or consolidates unused nodes to keep resource use efficient and costs low.
Ways to add nodes
Cloudfleet supports several ways to add compute capacity to a cluster. You can mix them in the same cluster:
Auto-provisioning Fleets on AWS, GCP, and Hetzner Cloud: Cloudfleet automatically creates, scales, and manages nodes based on your workloads. Hetzner Cloud needs only an API token. AWS and GCP use keyless authentication. On AWS, you create an IAM role that CFKE can assume (a Cloudfleet Terraform module automates this). On GCP, you grant IAM roles to a CFKE-managed service account principal in your project. See the Fleet configuration documentation for step-by-step setup instructions for each provider.
Self-managed nodes: Any VM or bare-metal Linux server can join your cluster, whether it runs in another cloud provider, your on-premises data center, or an edge location. You provision the machine yourself and connect it with a single command, or automate the process with Terraform. See the self-managed nodes documentation for instructions and provider-specific guides.
Infrastructure as code: For production environments, you can manage clusters, Fleets, and self-managed nodes declaratively with the Cloudfleet Terraform provider.
For a comparison of these approaches and guidance on when to use each, see How Cloudfleet provisions nodes.
This guide uses Hetzner Cloud because it is the fastest to set up: it needs only an API token. If you use a different provider or your own hardware, follow the related guide above, then continue with the next step. The rest of this guide is the same for all paths.
Prerequisites
Before you create the Fleet, make sure you have:
- A Hetzner Cloud account and project. If you do not have one, create it in the Hetzner Cloud Console.
- A Hetzner Cloud API token with “Read & Write” permissions, generated as explained in the Hetzner documentation. Copy the token and store it temporarily. You paste it into the Cloudfleet Console later.
You do not need to launch any servers in advance. Cloudfleet provisions them on demand through the Hetzner Cloud API when you deploy workloads.
Creating a Fleet
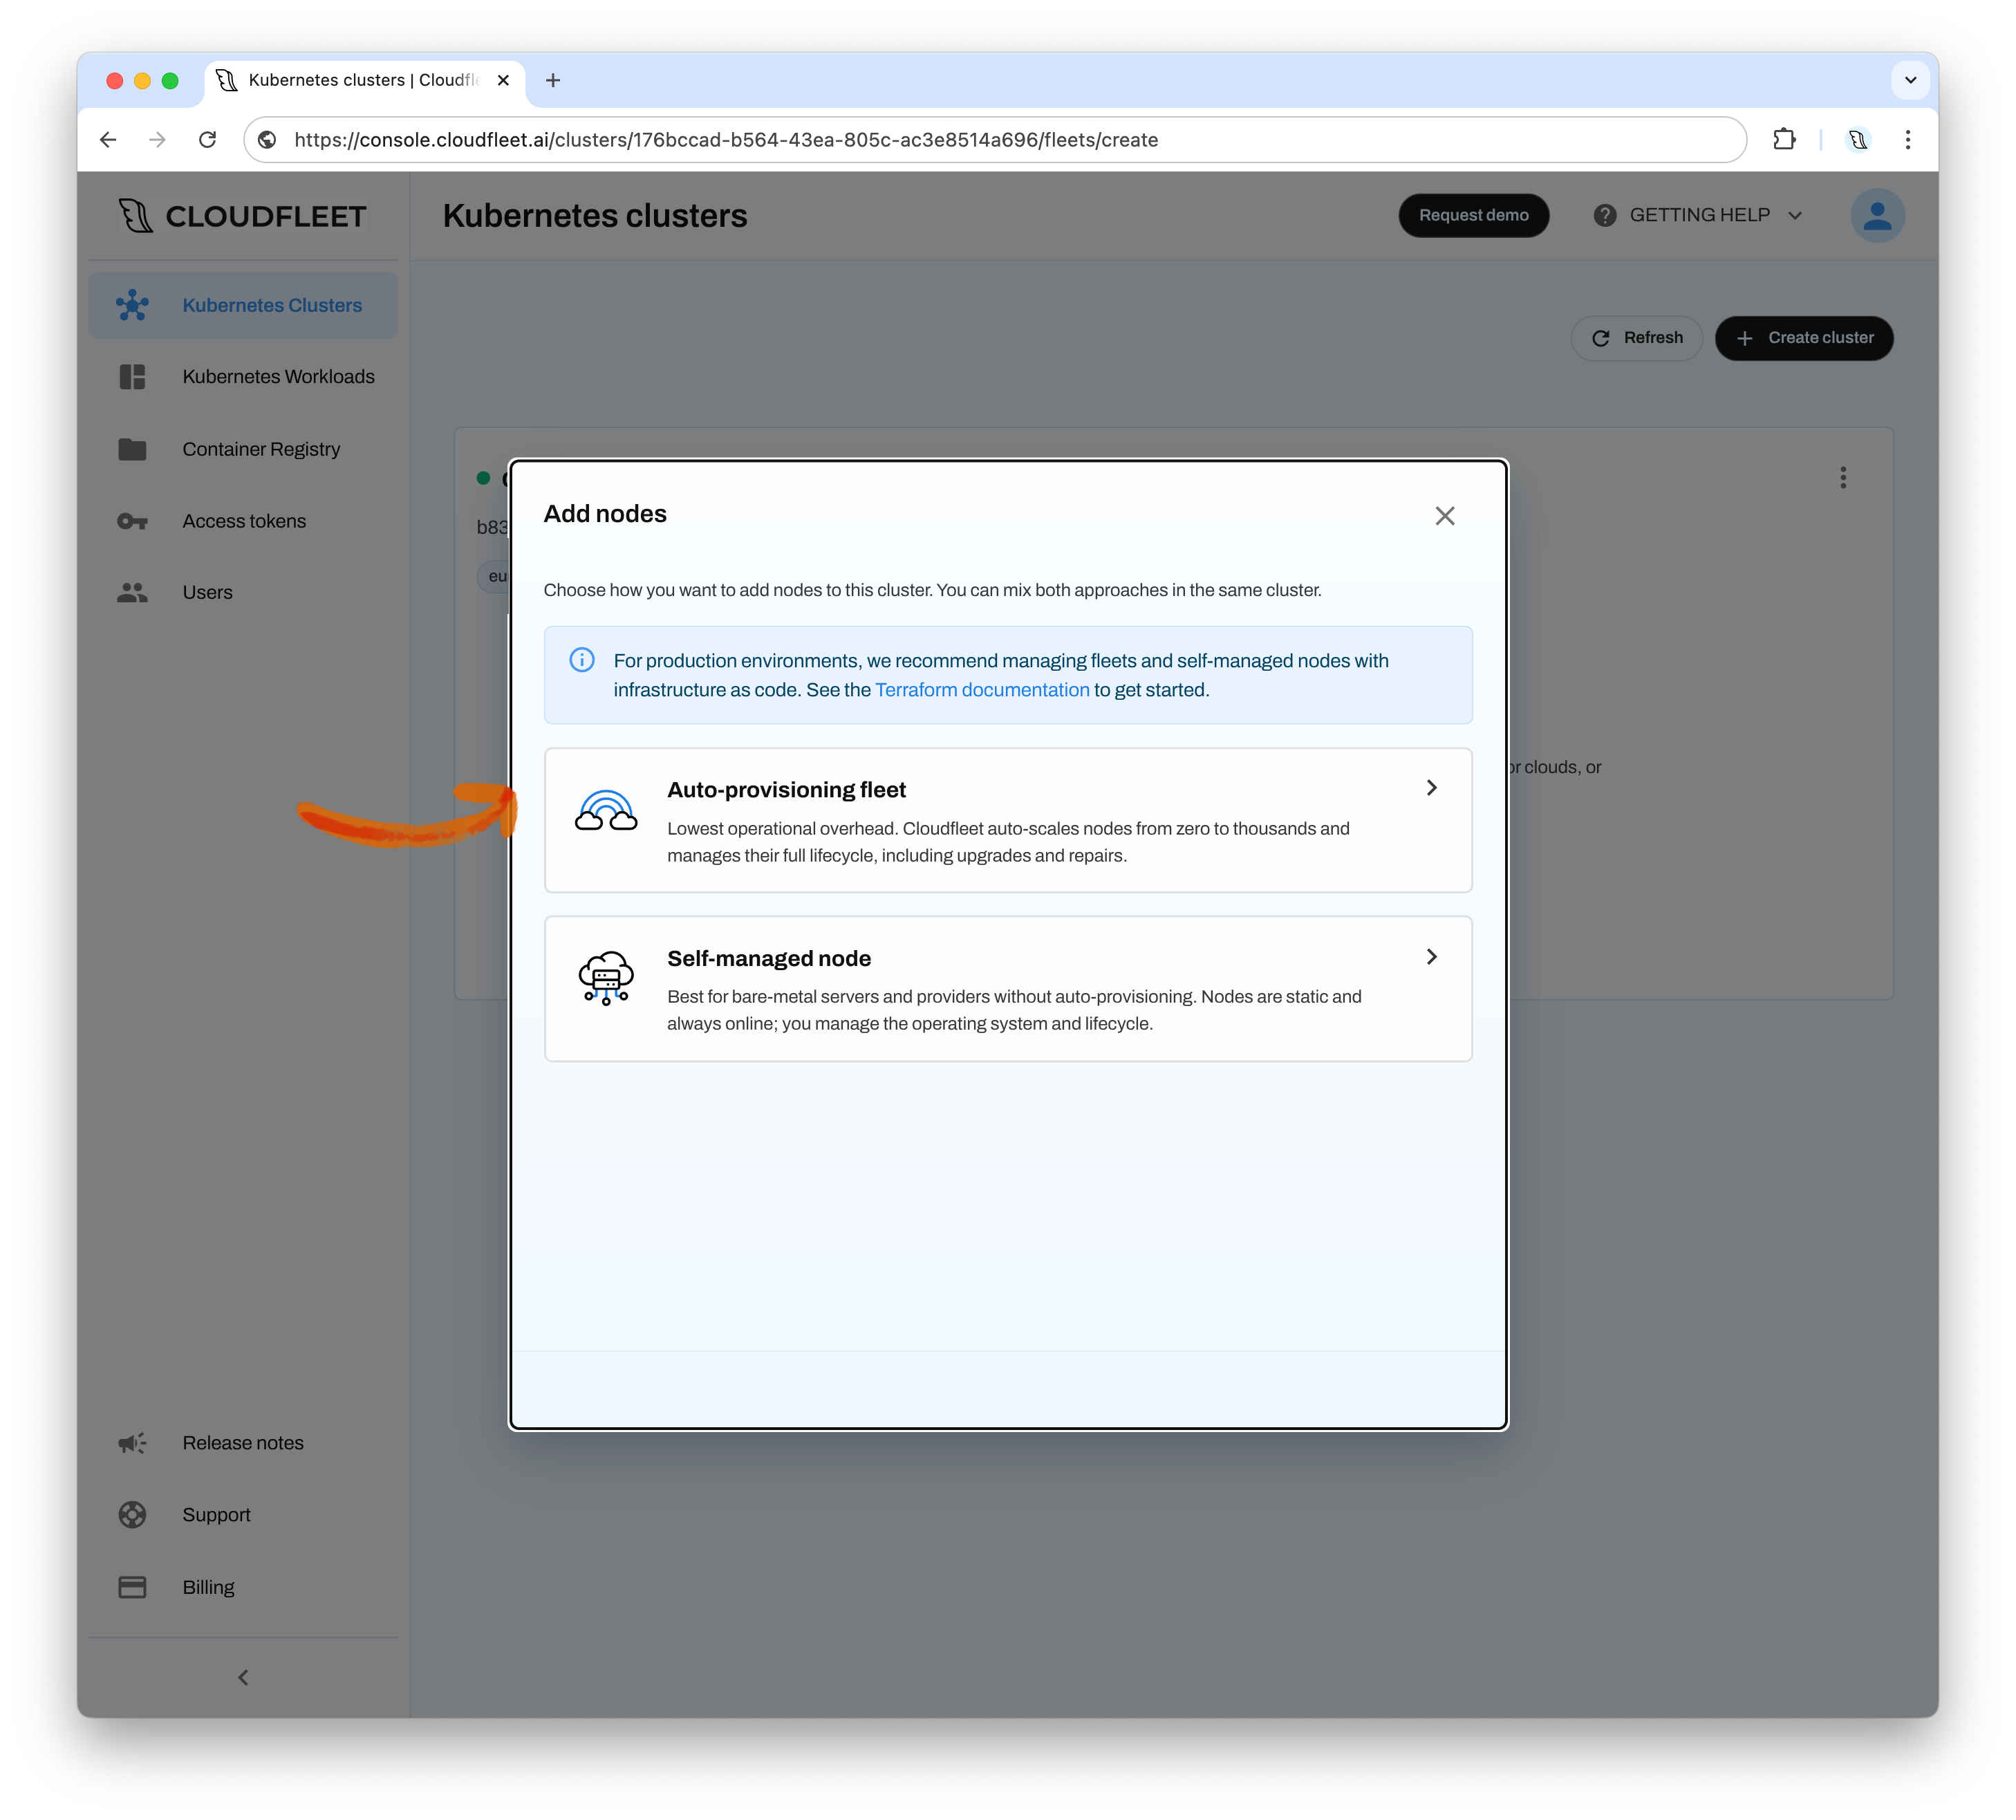
Open the node setup dialog: In the Cloudfleet Console, click “Add nodes” on your cluster’s card.
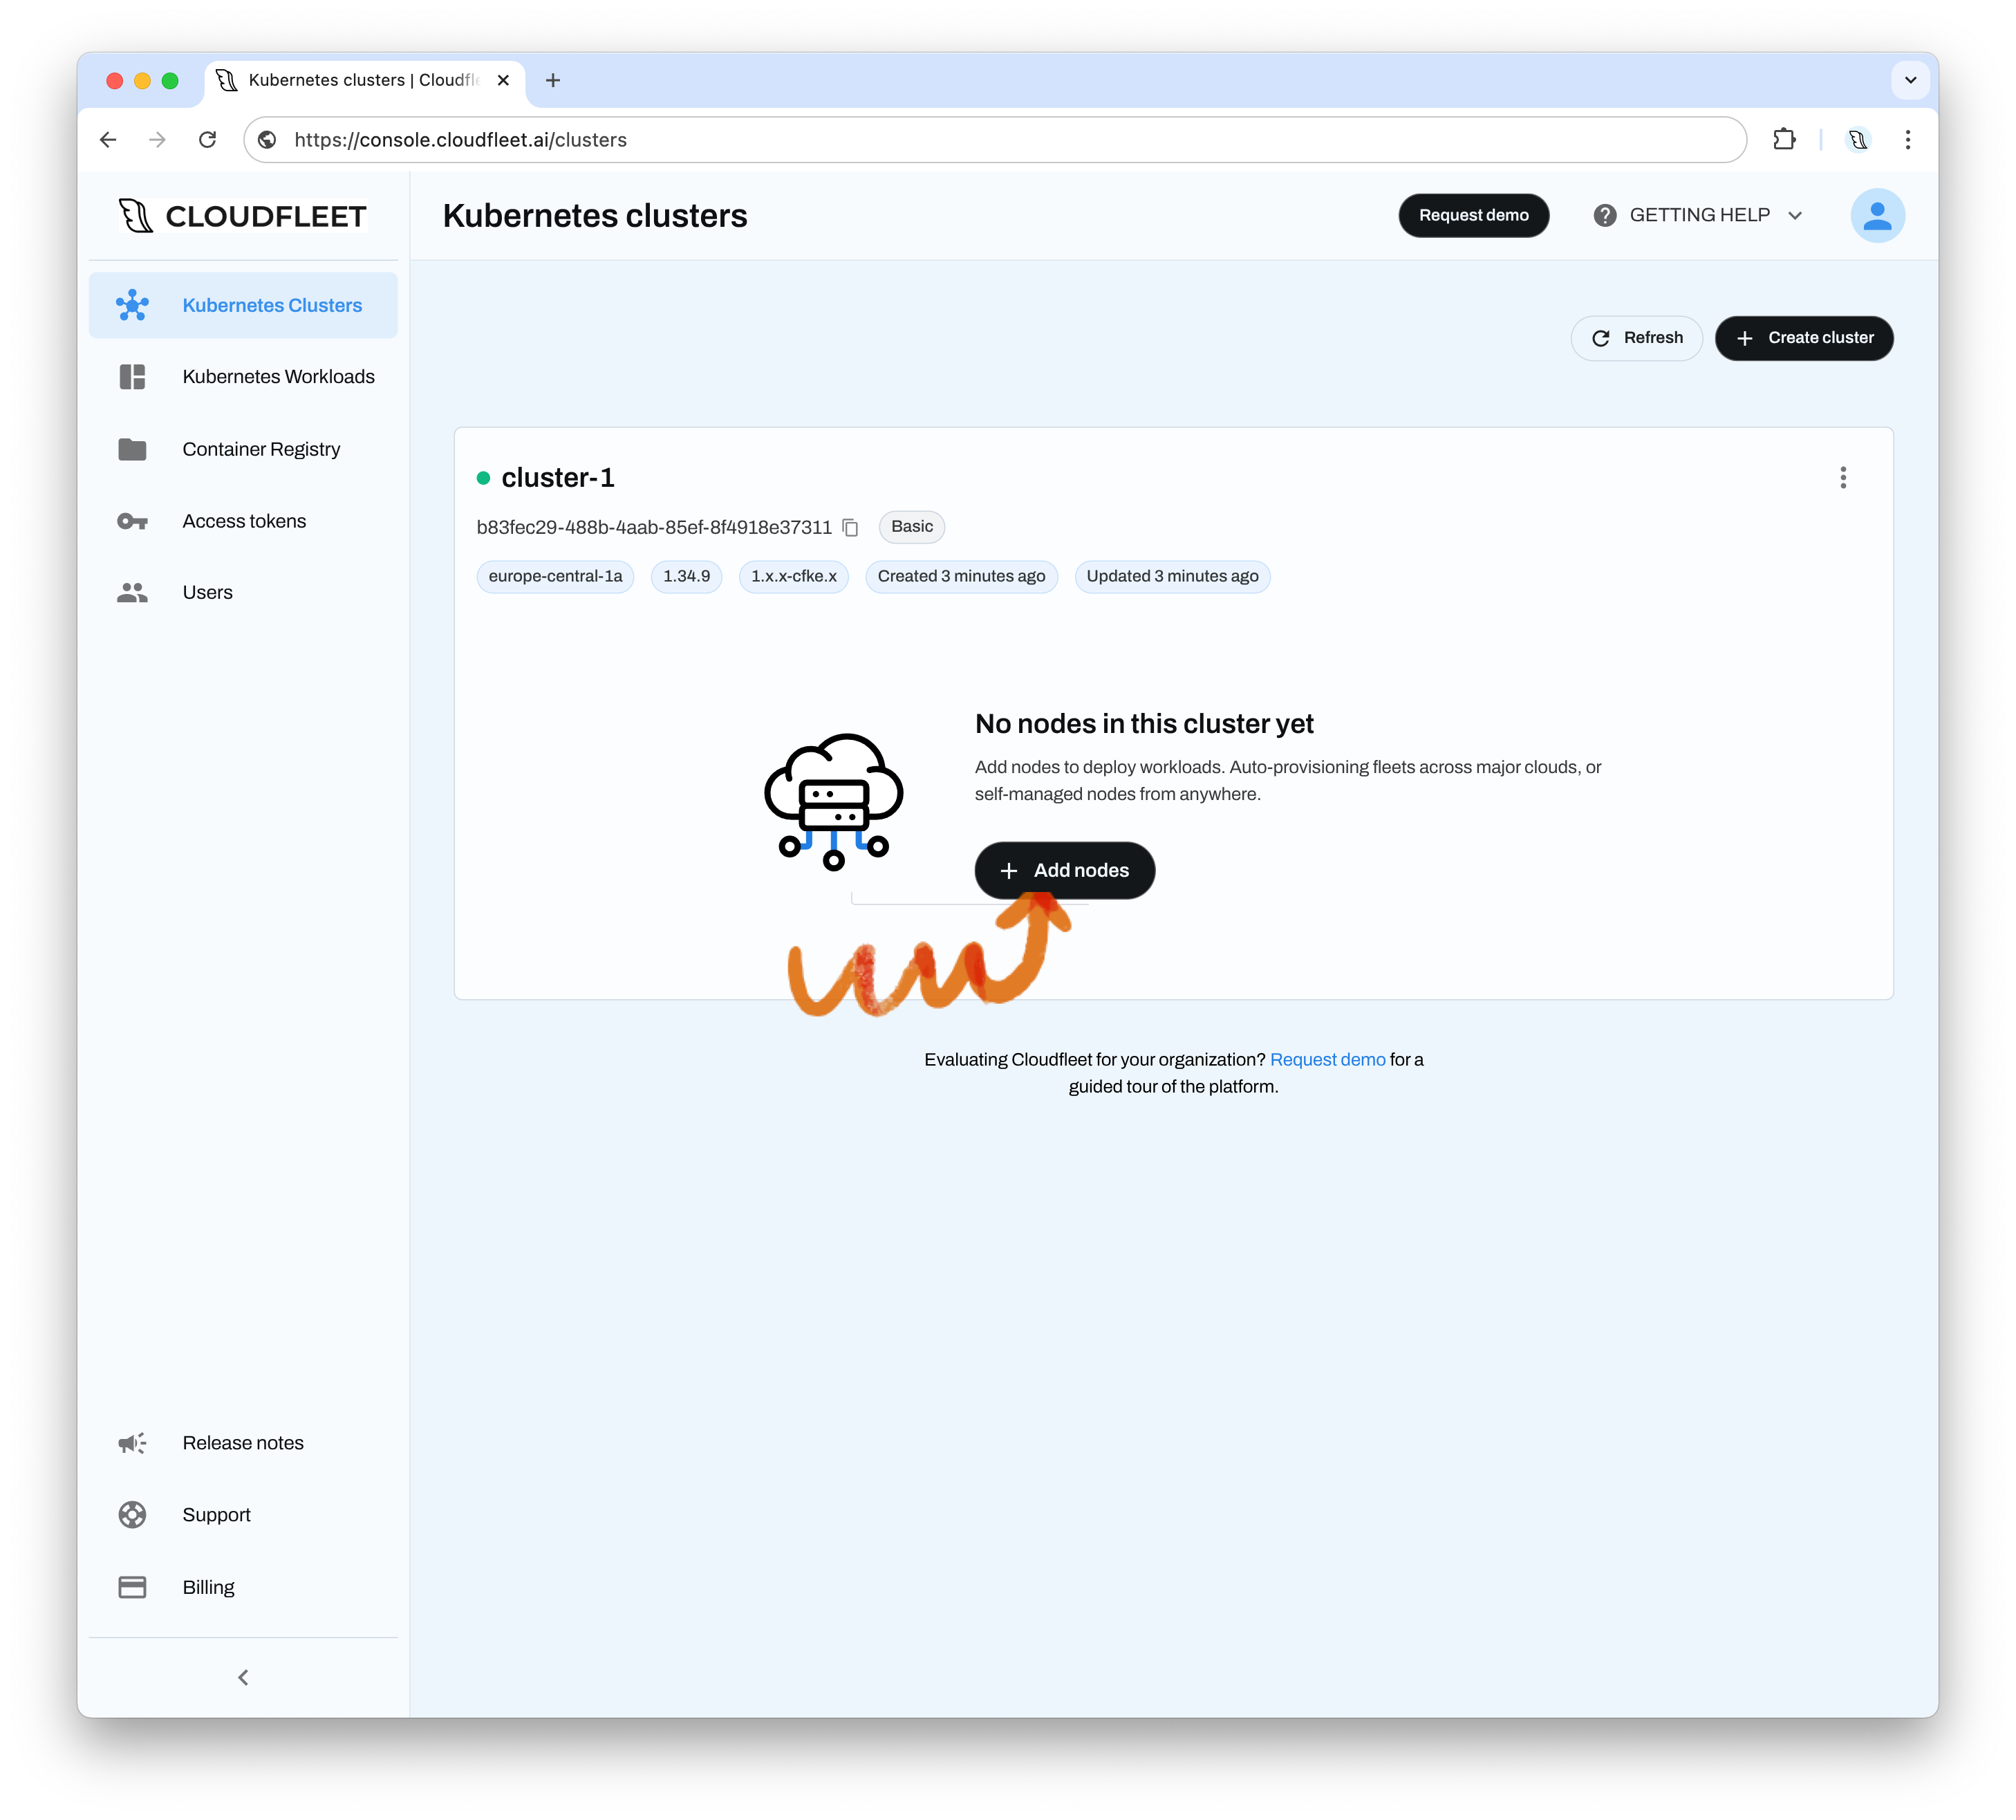
Cloudfleet supports two ways to add nodes to a cluster. With auto-provisioning Fleets, Cloudfleet creates and scales nodes for you automatically. With self-managed nodes, you connect servers that you manage yourself. For this guide, select “Auto-provisioning fleet”.
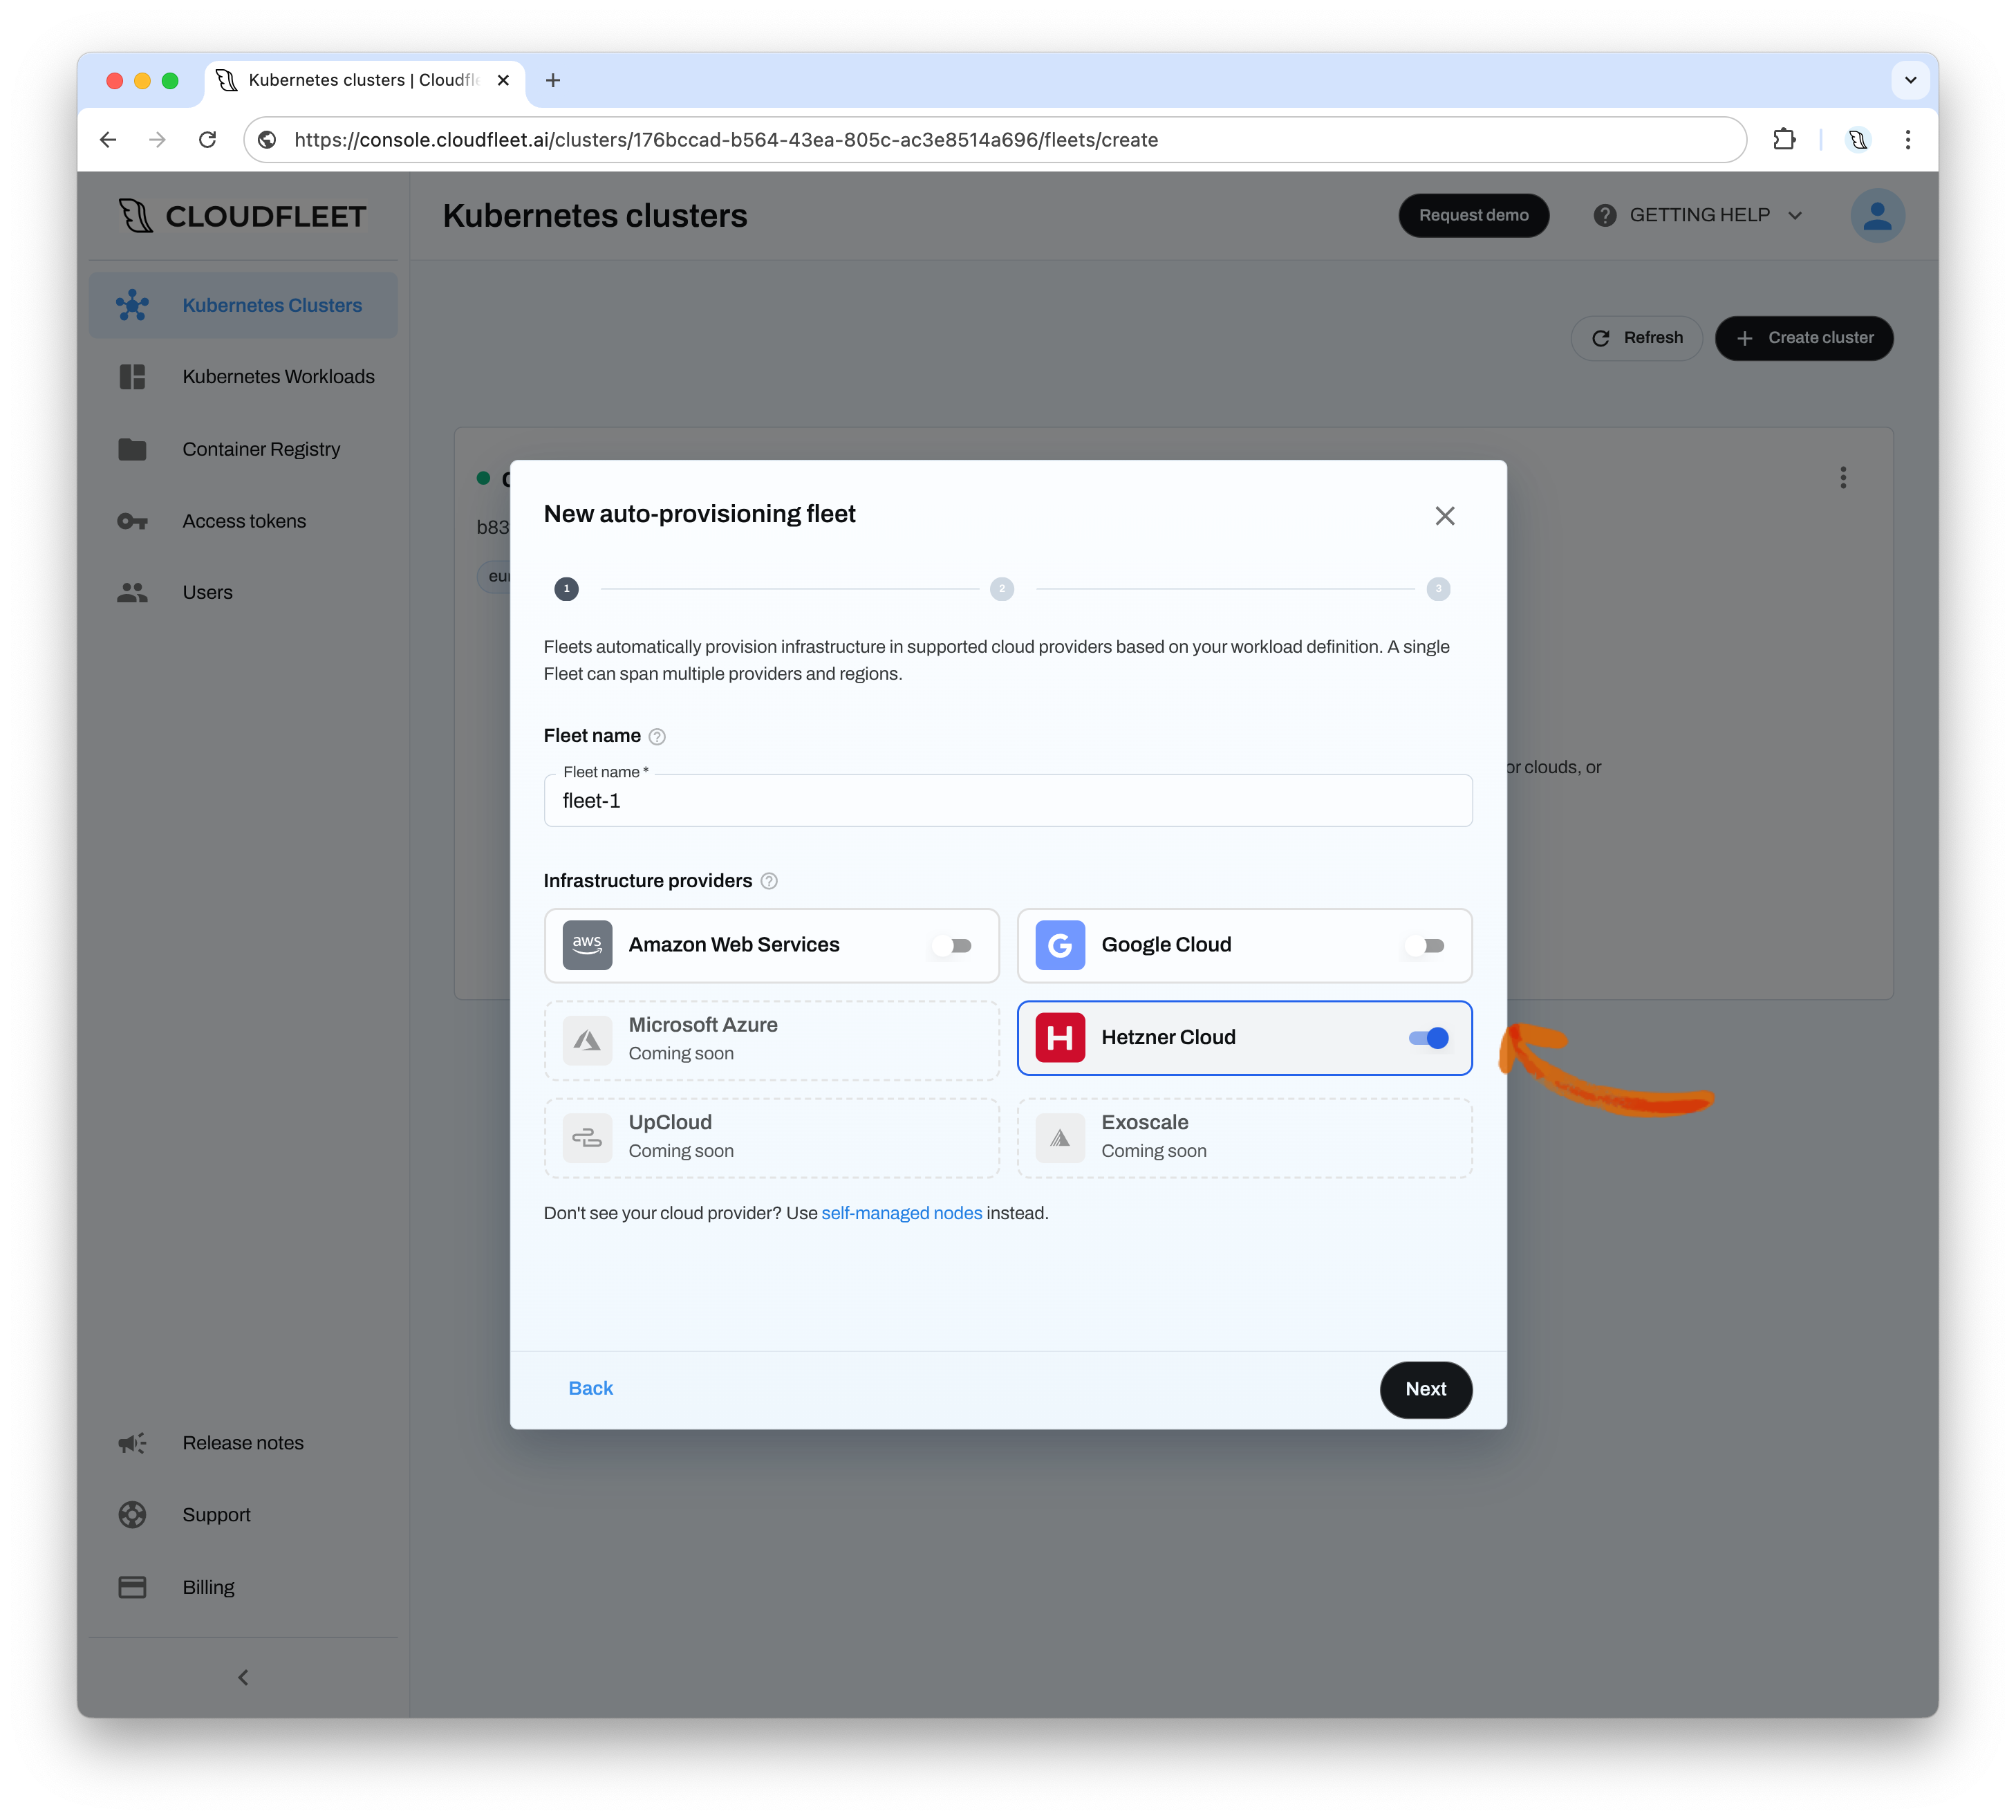
Choose a name and providers: Name your Fleet and select the infrastructure providers it can use. A single Fleet can span multiple providers and regions, so you can mix them in a single cluster. You can add more providers later. For this guide, enable “Hetzner Cloud” and click “Next”.
Provide the Hetzner API token: Paste the API token you generated earlier. Cloudfleet verifies the token and uses it to securely provision nodes in your Hetzner Cloud account. Cloudfleet creates the nodes directly in your Hetzner project, so you pay Hetzner for the infrastructure at their regular prices.
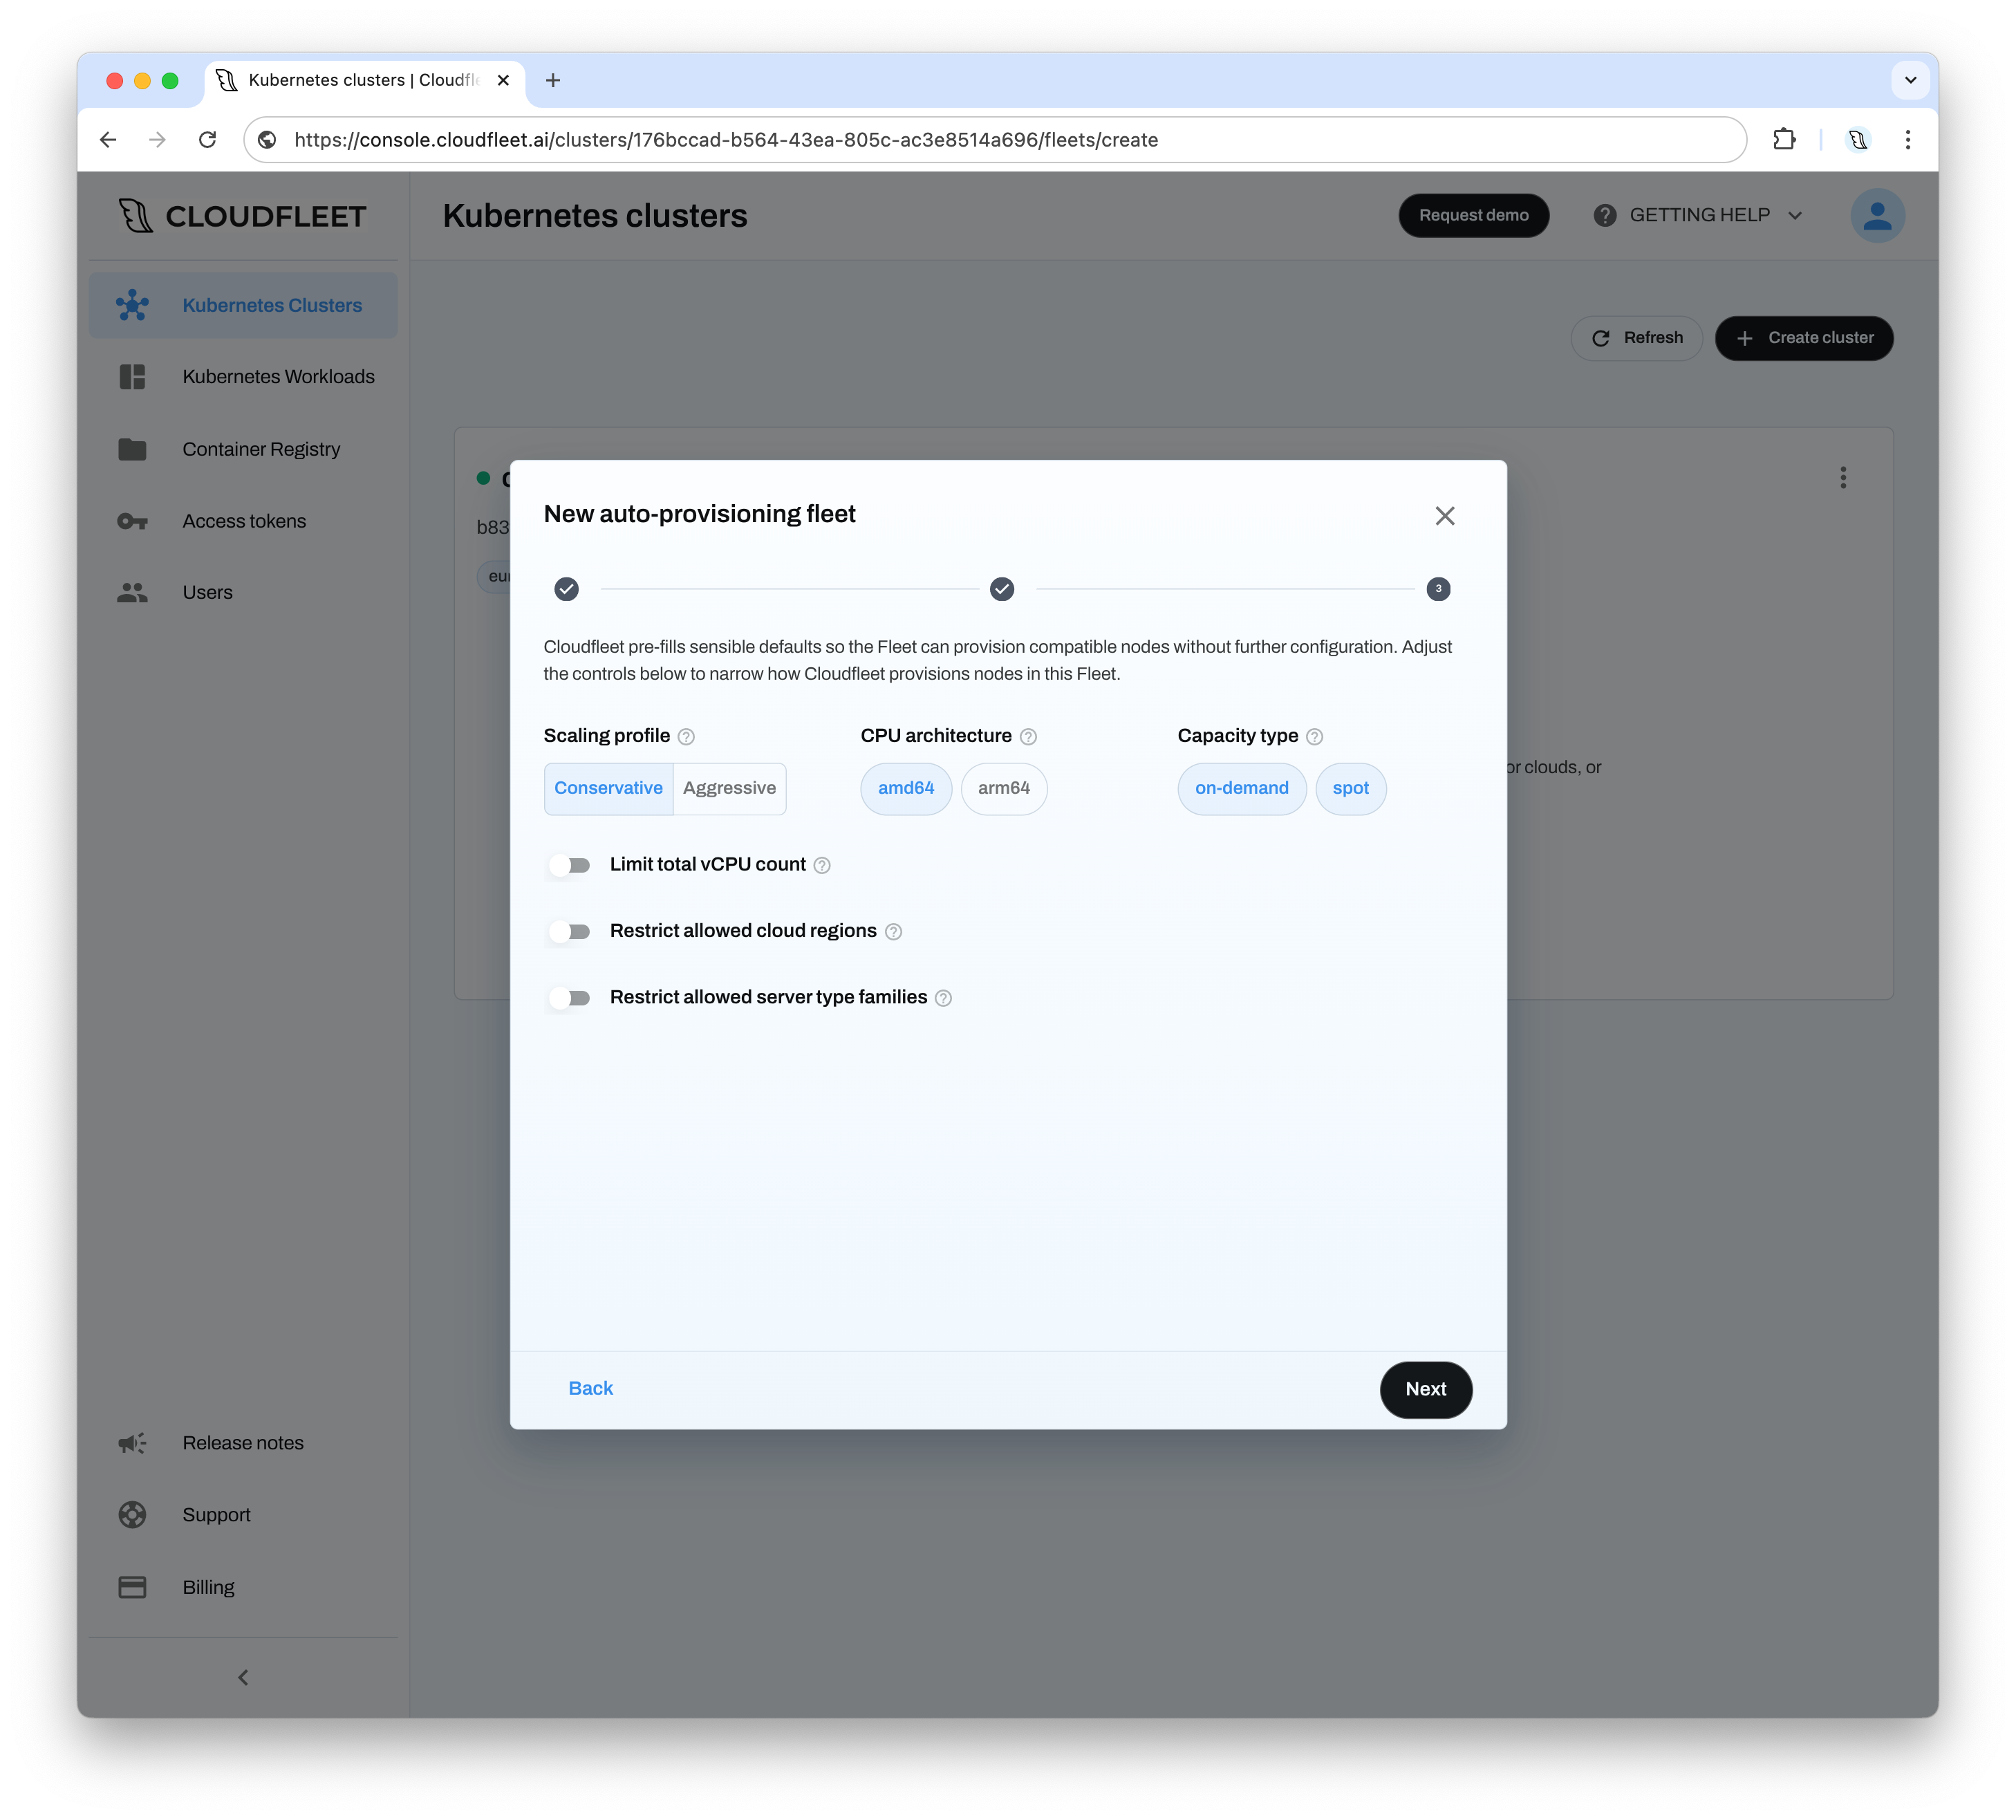
Fine-tune how the Fleet provisions nodes: Normally, your workload definitions set the size, location, and type of each node. Cloudfleet reads the resource requests, node affinities, and selector labels of your Pods, then picks the most cost-effective matching instance.
The Fleet configuration lets you narrow these choices. You can choose a scaling profile and restrict the CPU architecture (amd64/arm64) and capacity type (on-demand or spot). You can also cap the total vCPU count of the Fleet to control cost. To limit provisioning to specific regions and instance families, use Fleet constraints. The defaults are good for a first cluster.
Finalize Fleet creation: Review your Fleet configuration and click “Create”.


Cloudfleet now has the authorization and information it needs to provision worker nodes in your Hetzner Cloud account when you deploy applications to the CFKE cluster.
Step 4: Installing and configuring the Cloudfleet CLI
Next, install the tools to access the cluster and deploy applications. The Cloudfleet Command Line Interface (CLI), cloudfleet-cli (often called cloudfleet), manages Cloudfleet resources from a terminal. Use it to create and manage clusters, configure kubectl, add self-managed nodes, and interact with the Cloudfleet API programmatically.
Installing the Cloudfleet CLI
Cloudfleet provides installation methods for several operating systems. Package managers are the preferred method, because they make installation and updates easier. You can also find these instructions in the Cloudfleet Console: click “Configure kubectl” on your cluster’s card.

Cloudfleet CLI is available for MacOS as a universal binary.
You can install the CLI using Homebrew:
brew install cloudfleetai/tap/cloudfleet-cliIf you do not use brew, download the archive from this link and extract it on your system.
Cloudfleet CLI is available in Cloudfleet’s APT repository for x64 and ARM architectures. Install it with the following commands:
curl -fsSL https://downloads.cloudfleet.ai/apt/pubkey.gpg \
  | sudo tee /usr/share/keyrings/cloudfleet-archive-keyring.gpg >/dev/null
echo "deb [signed-by=/usr/share/keyrings/cloudfleet-archive-keyring.gpg] \
https://downloads.cloudfleet.ai/apt stable main" \
  | sudo tee /etc/apt/sources.list.d/cloudfleet.list
sudo apt-get update
sudo apt-get install cloudfleet
Cloudfleet CLI is available in Cloudfleet’s YUM repository for x64 and ARM architectures. Install it with the following commands:
sudo tee /etc/yum.repos.d/cloudfleet.repo << 'EOF'
[cloudfleet]
name=Cloudfleet
baseurl=https://downloads.cloudfleet.ai/yum
enabled=1
gpgcheck=1
gpgkey=https://downloads.cloudfleet.ai/yum/pubkey.gpg
EOF
sudo dnf install cloudfleet
You can also download the RPM package directly:
After you download the RPM package, install it with the following command:
sudo rpm -i cloudfleet.rpmCloudfleet CLI is available as a ZIP package:
After you download the ZIP package, extract it and run the cloudfleet binary.
To verify the installation, run cloudfleet --version or cloudfleet --help.
Installing kubectl
The Kubernetes command-line tool, kubectl, runs commands against the Kubernetes cluster. It works together with Cloudfleet CLI to interact with your CFKE cluster.
If you already use Kubernetes, you might have kubectl installed. If not, see the Kubernetes documentation for the installation methods for your platform. On macOS, you can install kubectl with Homebrew (brew install kubectl), and on Windows with winget (winget install kubectl).
Connecting kubectl to your CFKE cluster
To interact with the Kubernetes cluster through kubectl, update the local kubectl configuration (kubeconfig) to point to the new CFKE cluster. Also configure the Cloudfleet CLI with your account, so that it can authenticate against the cluster.
To do these steps, click “Configure kubectl” on your cluster’s card in the Cloudfleet Console. The “Connect to cluster” wizard guides you through the CLI tool configuration. If you already installed the Cloudfleet CLI, skip the first step.

First, create a profile to tell the CLI which organization you work with. Copy and run the first command from the wizard. Replace YOUR_ORGANIZATION_ID with your organization ID:
cloudfleet auth add-profile user default YOUR_ORGANIZATION_IDThis command configures a profile named “default” for your CLI. If you have access to multiple organizations, you can configure your CLI for them too, but “default” is enough for now. The wizard shows your organization ID. You can also find it in the console: go to Billing -> Payment and look under the Billing Contact Information section.
Note: User authentication needs a browser. The CLI opens a browser window to authenticate the user. If you use the CLI in a headless environment (including WSL on Windows), use token-based authentication as a workaround.
After you add the profile, configure kubectl to use the Cloudfleet CLI as an authentication helper. You then do not need to configure certificates or manage passwords manually. Copy and run the second command from the wizard. Replace YOUR_CLUSTER_ID with your cluster ID:
cloudfleet clusters kubeconfig YOUR_CLUSTER_IDThis command updates your ~/.kube/config file. You can then access your CFKE cluster with a new context named YOUR_CLUSTER_ID/default. For convenience, set the current context to the new cluster:
kubectl config use-context YOUR_CLUSTER_ID/defaultVerify the connectivity with the following command:
kubectl cluster-infoThe output shows information about the Kubernetes control plane. Another useful command is:
kubectl get nodesIf you have not deployed any workloads, this command returns no nodes. This is normal and expected. The node auto-provisioner provisions CFKE worker nodes on demand, so a new cluster starts without any nodes. Nodes appear automatically when you deploy your first application in the next step.
Step 5: Deploying your first application
The CFKE cluster is running, a Fleet is configured, and kubectl is connected. Now deploy a sample application with standard Kubernetes tooling (kubectl). The sample shows how Cloudfleet orchestrates workloads through Kubernetes and how its node auto-provisioner works.
Deploying a sample application
A common “hello world” example for Kubernetes is deploying an Nginx web server.
Create a Kubernetes Deployment with the following kubectl command:
kubectl create deployment nginx-deployment --image=nginx:latest --replicas=2This command instructs Kubernetes to:
create deployment nginx-deployment: Create a new Deployment object namednginx-deployment.--image=nginx:latest: Use the latest official Nginx image from Docker Hub.--replicas=2: Request two running instances (Pods) of the Nginx application. Two replicas give a basic level of availability. They also show better how Kubernetes distributes workloads, possibly across multiple auto-provisioned nodes.
After the deployment, CFKE finds the most cost-effective server that meets the location and resource requirements of the Pods. With the Hetzner Fleet from this guide, both Nginx Pods fit on the smallest available server type, provisioned in the cheapest available region. The whole demo runs on a single small virtual machine that costs a few cents per hour, billed directly by your cloud provider.
Checking your deployment
After you run the deployment command, Kubernetes starts to work toward the desired state.
Check Deployment status:
kubectl get deploymentsThis command shows the nginx-deployment and its status, including the number of replicas that are ready and available.
Check Pod status:
kubectl get podsThis command lists the individual Nginx Pods and their current status. At first, they can go through states such as Pending and ContainerCreating before they reach the Running state.
The Pods can stay in the Pending state for a short time while Cloudfleet’s node auto-provisioner provisions new worker nodes for them in the configured Fleet. This is expected behavior and shows a key automation feature of CFKE.
Note: If Pods stay in
Pendingfor more than a few minutes, open the Events tab in the Cloudfleet Console. The tab reports provisioning problems such as an invalid API token, provider quota limits, or overly strict Fleet constraints. If you get stuck, contact support.
Watch nodes being provisioned:
You can watch the provisioning process while it happens. A NodeClaim object represents each node request:
kubectl get nodeclaims -o wideThe output shows the instance type, capacity type, and region that the node auto-provisioner selected for each node. After the nodes join the cluster, they appear in kubectl get nodes. After a few moments, the output looks similar to this (names, instance types, and regions differ based on your Fleet):
$ kubectl get pods
NAME                               READY   STATUS    RESTARTS   AGE
nginx-deployment-98d9dcdf8-mdtwc   1/1     Running   0          5m48s
nginx-deployment-98d9dcdf8-x7k2p   1/1     Running   0          5m48s

$ kubectl get nodeclaims -o wide
NAME            TYPE   CAPACITY    ZONE   NODE                       READY   AGE     IMAGEID        ID                                                NODEPOOL   NODECLASS   DRIFTED
fleet-1-d4p4t   cx23   on-demand   nbg1   inviting-bull-2768940197   True    5m44s   ubuntu-24.04   hetzner://fleet-1/nbg1/inviting-bull-2768940197   fleet-1    fleet-1

$ kubectl get nodes
NAME                       STATUS   ROLES    AGE     VERSION
inviting-bull-2768940197   Ready    <none>   4m33s   v1.34.9
You can also watch the node provisioning progress on your cluster’s card in the Cloudfleet Console:

Kubernetes components generate events for all changes in the cluster. You can monitor these events with kubectl events, or use the Events tab in the Cloudfleet Console for an aggregated view of events across all your clusters:

When the nodes are ready and all Pods are running, go to the Workloads tab in the Cloudfleet Console to view the current state of your Pods:

The provisioned instances appear in your own cloud provider console as regular virtual machines. Cloudfleet tags all servers it creates, so you can identify them and monitor them for cost tracking.
Understanding node auto-provisioning in action
When you created the nginx-deployment, CFKE’s node auto-provisioner detected the new workload requirements (two Nginx Pods that need resources).
If the cluster has no suitable worker nodes, or existing nodes are at capacity, the node auto-provisioner automatically does these steps:
- Calculate the optimal type and size of virtual machines from the configured Fleet (for example, specific instance types from AWS, GCP, or Hetzner).
- Provision these new nodes.
- When the nodes join the cluster and are ready, Kubernetes schedules the Nginx Pods on them.
The node auto-provisioner selects which nodes to create based on Pod requirements and labels. This example adds no labels to the Pods, so CFKE creates the nodes with the cheapest available option. CFKE is a global solution, so it also finds the cheapest region among the providers in your Fleet and runs the workload there.
Often, you want to control which cloud or geography your workload runs in. In this case, use Pod labels and node selectors to tell CFKE to deploy the workloads only in those places. To learn about the many workload scheduling options in CFKE, see the node auto-provisioning document.
Step 6: Exposing the application to the internet
In Kubernetes, Services expose Deployments to the public internet. A Service is a Kubernetes object that works as a load balancer and sends traffic to the right Pods based on labels.
To expose the demo Nginx Deployment, create a Service with the following command:
kubectl expose deployment nginx-deployment \
    --type=LoadBalancer --name=nginx-service \
    --port=80 --target-port=80
When you create a Service of type LoadBalancer in CFKE, Cloudfleet detects the cloud providers and regions where your nodes run. It then automatically provisions a load balancer in each of them. In a single-provider setup like this guide, you get one load balancer in your cloud account, next to your nodes. In a multi-cloud cluster, CFKE provisions a load balancer in every provider and region where nodes exist, so traffic is served close to your workloads.
After the load balancer is provisioned, get its IP address with this command:
$ kubectl get svc nginx-service
NAME            TYPE           CLUSTER-IP      EXTERNAL-IP                    PORT(S)        AGE
nginx-service   LoadBalancer   10.111.186.87   192.0.2.254,2001:db8:5678::1   80:30239/TCP   96s
The external IP address (or addresses, in a multi-cloud cluster) appears in the EXTERNAL-IP column. Open this address in a web browser. The default Nginx welcome page appears.
Note: Load balancer provisioning and features vary by cloud provider. For the current support matrix and configuration options, see the load balancing documentation. For self-managed environments, see on-premises load balancing with BGP.
When you finish, remove the demo application with kubectl delete svc nginx-service and kubectl delete deployment nginx-deployment. The node auto-provisioner consolidates and removes nodes that are no longer needed for your workloads.
Next steps: Continue your Cloudfleet journey
Congratulations! You completed the first steps with Cloudfleet. You created an account, launched a CFKE cluster, configured a Fleet, installed the CLI, and deployed and exposed a sample application. You now know the basic Cloudfleet workflow and how it simplifies Kubernetes management.
Explore more Cloudfleet features
Cloudfleet offers many features for scalable and flexible Kubernetes operations. Explore these areas next:
Deeper dive into node auto-provisioning: Learn how CFKE manages worker nodes on supported cloud providers. Use scheduling constraints, taints, tolerations, and affinity/anti-affinity rules to influence node selection and workload placement. The documentation also covers labels such as
cfke.io/accelerator-nameorkubernetes.io/archfor fine-grained control.Persistent volumes: If your applications need storage that survives Pod restarts, install the CSI driver for each cloud in your Fleet. On AWS and GCP the drivers authenticate without keys.
Manage Cloudfleet from AI assistants: Connect Claude and other AI assistants to your Cloudfleet organization through the MCP server to inspect clusters, query workloads, and manage support tickets in natural language.
Advanced networking: Cloudfleet’s global secure networking connects nodes across clouds and regions as if they were on the same network. Learn more about multi-region/multi-cloud load balancing and options to integrate with on-premises networks, for example with BGP for on-premises load balancing.
Hybrid and on-premises deployments: Learn how to add self-managed Linux servers from any cloud provider, on-premises data centers, or edge locations to a CFKE cluster. You can provision self-managed nodes with Terraform or add them manually. They are an alternative to node auto-provisioning for infrastructure that is not yet natively supported. Tutorials cover specific scenarios, such as deploying Kubernetes on Proxmox.
Accessing cloud APIs securely: Learn how workloads on CFKE securely access public cloud provider APIs (for example, AWS S3, GCP BigQuery, Azure Blob Storage) with OIDC. Your applications do not need hard-coded credentials.
GPU-accelerated workloads: For AI/ML tasks, learn how to use GPUs with Cloudfleet, for example with specialized providers like Lambda Cloud or specific GPU instances on AWS/GCP.
Integrating Cloudfleet with CI/CD: Authenticate GitHub Actions and GitLab CI pipelines to your CFKE clusters using OIDC workload identity federation, with no long-lived credentials in your repositories.
Further resources
To continue learning and make the most of Cloudfleet:
Cloudfleet documentation: The official documentation covers all Cloudfleet features and configurations: https://cloudfleet.ai/docs
Cloudfleet tutorials: Practical guides and step-by-step instructions for many use cases, from general Kubernetes operations to specific integrations and AI/ML setups: https://cloudfleet.ai/tutorials/
API reference: For programmatic interaction and automation, the API reference describes the Cloudfleet API endpoints: https://cloudfleet.ai/docs/reference/api-reference/
Support: If you need help or have specific questions, contact the Cloudfleet team through support
The Cloudfleet team works to make Kubernetes straightforward to operate, from datacenters to the cloud and the edge. This guide is only the start of what you can do with the platform.